Example of Diapason session
This example corresponds to the S07_init_En introductory session on Thermoptim.
The original files are the slideshow S07_init_En.ppt and the file containing the soundtracks S07_init_En.doc.
File containing the soundtracks S07_init_En.doc
The teacher must start by using these two files to on the one hand generate in jpg or png format the images that will appear, and on the other hand record in mp3 format the different soundtracks corresponding to each image, taking care that they are not too long (typically less than 1 to 2 minutes). If necessary, it is better to split the step.
It is possible to directly export all slide images from Powerpoint or its equivalent in the LibreOffice suite, or simply make a screenshot of each slide and save it. Free Paint or Gimp software allows you to rework images if necessary.
To make recordings, the teacher can, for example, use the Audacity sound editor or speech synthesis software like Balabolka, which are freely downloadable.
The teacher thus creates a set of pairs of files (image, soundtrack), the most practical being to name them in the same way, only the extension being different, and to transfer their name to the soundtrack file S07_init_En .doc (see figure below) and in comments to the Powerpoint file. This will allow him or her to easily find the originals later.
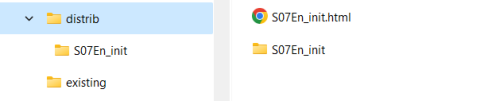
Once this work is done, we recommend placing the viewer html file in the "distrib" folder, and all of these files in a subdirectory of the session name (figure below), Do the same for other files used by the session such as PDFs, spreadsheets, etc.
All that remains is to create the visualization file, which we will also name after the session (here S07En_init.html).
Configuring the visualization file
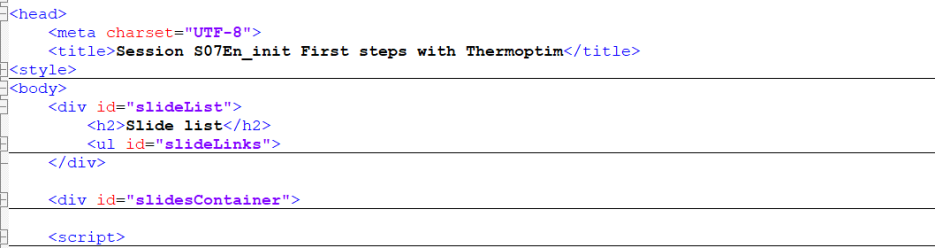
The figure below shows the overall structure of the html file:
in the <head> tag appears the <style> tag which contains the CSS code of the file
next comes the slideList division which defines the list located on the left of the screen
then the slidesContainer division which includes all the step blocks, which provide in particular the links to the jpg or png and mp3 files and specify the titles of the different steps
finally, the <script> tag contains the JavaScript code which manages the scrolling of the different slides
We will now explain how each of these blocks is constructed, knowing that only the second and third need to be modified to obtain a new Diapason session.
<style> tag
It contains the CSS code of the file. CSS (Cascading Style Sheets) contain the code used to format a web page. If you want to modify it, it is best to start by familiarizing yourself with this language.
SlideList division
It defines the list located on the left. Its syntax is very simple, as shown in the figure below
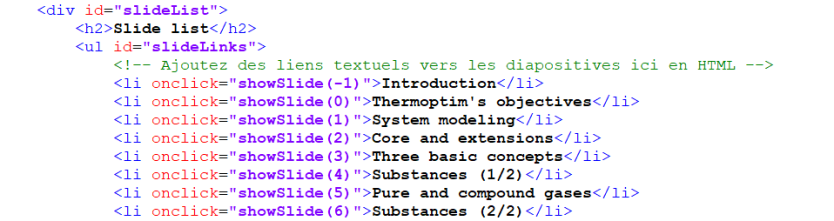
Each slide corresponds to a line, which reads as follows: when clicking (onclick), execute the showSlide function, with an index representative of the slide to display as an argument. The title appearing in the list is then indicated.
To build the block, you must enter this title and pay close attention to the value of the index.
SlidesContainer division
It provides the links to the jpg or png and mp3 files and specifies the titles of the different devices, as shown in the figure below.
Step block
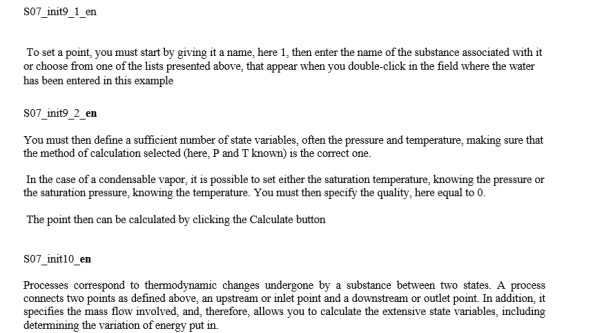
We can consider that there are two kinds of step blocks, those used to comment on the session, and those corresponding to the different slides. Obviously, it is possible to add comments to one of the second kind.
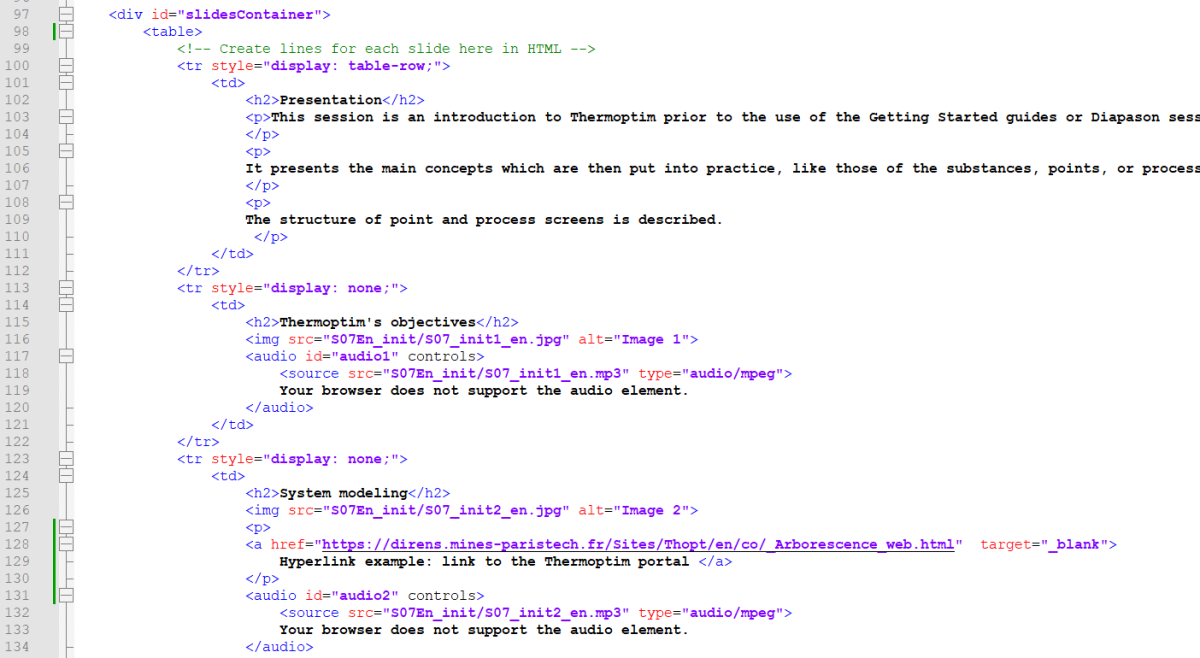
As shown in the figure below, the first introductory page has neither image nor soundtrack. It just contains the very simple html code corresponding to the presentation of the session.
Now let's look at the next step block, representative of a slide. Its title is “Thermoptim's objectives”, contained in the <tr> tag between lines 113 (<tr style="display: none;">), and 122 (</tr>).
It contains :
line 115 the title in the <h2> tag (for “header” of size 2)
line 116 the <img> tag which provides the link to the image to display
lines 117 to 120 the <audio> tag which contains line 117 the identifier of the step to display, here “audio1”, formed by concatenating the index of the step, here 1, to the word "audio" and line 118 the link to the sound file. The following line 119 is there to warn the user if their browser is unable to play the mp3 file.
To build a step block, you must enter the title and the links to the two files while respecting the syntax of the different tags, and correctly configure the step identifier.
The slidesContainer division is made up of all of these step blocks, placed one after the other.
Three important points should be noted:
their place in the slidesContainer division determines the order of passage of the steps when viewing the Diapason session
for each of them the step index concatenated to the audio word must be its order number
the only steps that are played are those that appear in the slideList division's list. If it is truncated, the step blocks missing from the list can remain in the html file, but they are not viewed
Consequently, if we modify the order of the step blocks or if we add or delete some of them, we must also modify the step index concatenated to the audio word of each step, as well as the list of the slideList division , which can be a bit laborious if there are many steps in the session.
This is why we have developed a small Java utility allowing you to easily modify the order of the steps while respecting these rules. It will be presented in the page relating to the html file editor of the Diapason viewer .
Inserting hyperlinks
It is possible to insert hyperlinks to PDFs, web pages or others.
Lines 127 to 130 of Figure 6 provide an example. In the step following the one we have just commented on, the title of which is “System modeling”, we have inserted a hyperlink pointing to the home page of the English version of the Thermoptim-Unit portal. We placed it in a <p> tag so that the link is below the image and not next to it.
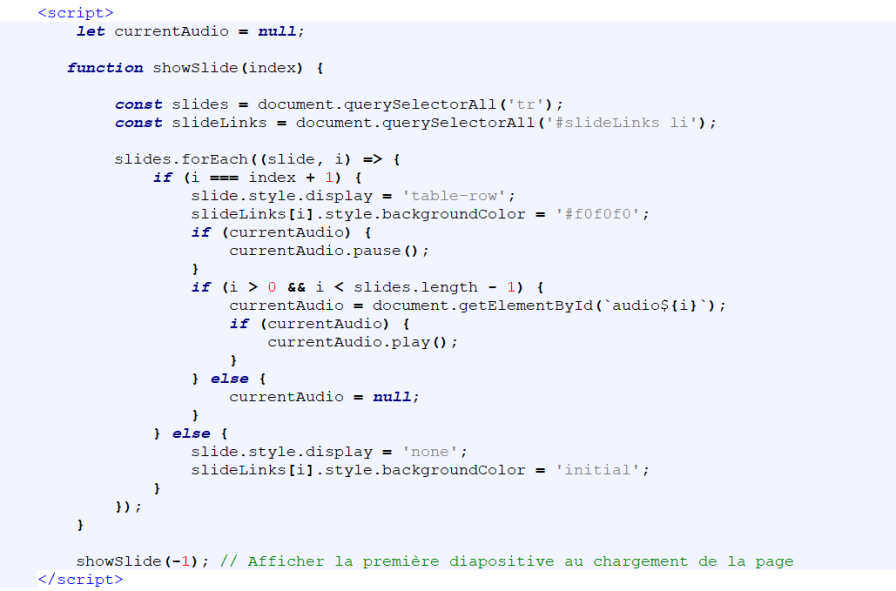
<script> tag
It contains the JavaScript code which manages the scrolling of the different slides. If you want to modify it, know that it is best to master this language well and then be very careful, otherwise the viewer will no longer work correctly.
The html file that we obtain is available here. This document is licensed under the Creative Commons CC BY-SA 4.0 (Attribution-ShareAlike 4.0 International) license.
As indicated above, we recommend that you place it in the "distrib" folder, the image and sound files being put in a subdirectory of the same name as the session. You will thus have all your Diapason sessions in the same perfectly structured folder.
The folder containing the session files for this example is available here.
Another variation of the viewer
This example of a viewer is deliberately very simple, so that it can be easily reused by teachers who do not have a particularly good command of HTML, CSS or JavaScript languages.
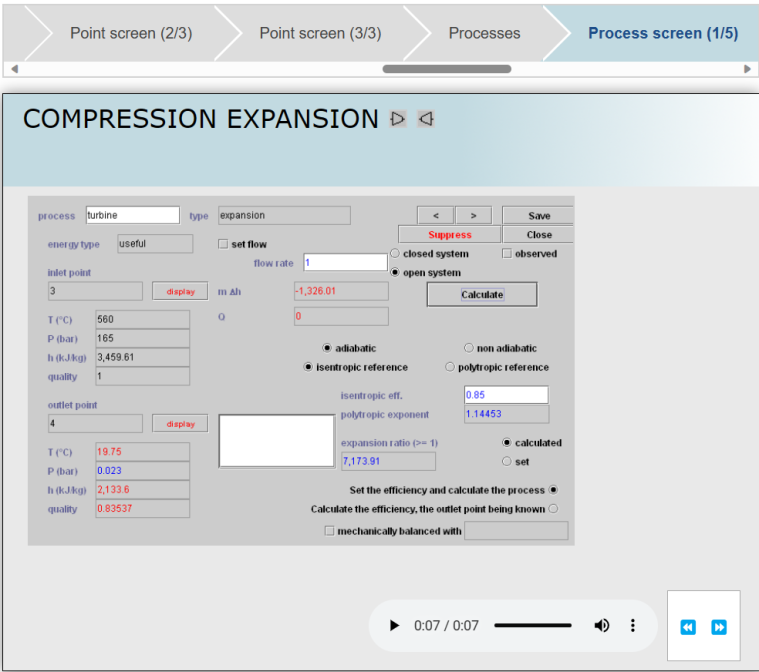
The one used in the Thermoptim-Unit portal (figure below) was designed by Mr. Nicolas VION, who masters them very well.
The list on the left is replaced by a top banner, and scrolling buttons allow you to move forward and backward, but above all the visuals that appear are coded in HTML, which allows for better rendering. On the other hand, the html file is much more complex and difficult to adapt for a new session, and it requires a much larger set of additional files.
The important thing is that these two versions are functionally equivalent, which is essential from an educational point of view.
